My Switch to Azure Websites

My Switch to Azure Websites
I am a developer first. I’ve become my family’s IT department but not by choice. This is the fate of most developers I know.
For the past year or so I’ve been experimenting with Azure Websites as a solution for quick, one-off sites and even for class examples. I’m a big fan. Let me tell you why.
Why Azure Websites?
Azure is a diverse landscape with lots of services. It be a little daunting. I’ve some of these services, but certainly not all. Azure Websites is particularly interesting to me in that fulfills my desire to not be an IT guy. Why?
Azure VMs and Web/Worker Roles are both interesting ideas, but for many of my projects (especially smaller ones) I just want to host some code and possibly some data. Azure Websites lets me push some code to a server and fire and forget. It’s pretty magical.There are a lot of great tutorials on getting that to work (including the great Visual Studio 2013 Update 2 integration) so I don’t want to repeat all of that.
Because I’ve been in that playground a while, I’ve had some of my newer projects completely hosted there (e.g. http://howtowat.ch). I’ve had a long relationship with OrcsWeb and absolutely love how great they’ve been. Just amazing technical support, but with my upcoming world tour I wanted to consolidate and not have to manage RDP-ing into a box. I just wanted it to work. So I decided to move all of my sites to Azure Websites.
The other reason I liked Azure Websites is that it can host a variety of technologies for me. I use ASP.NET MVC for most of my projects but there are a couple of Node.js projects (including using Ghost for a blog engine for some of my sites). Azure Websites can do PHP (which means WordPress) and other platforms too. When I shoehorned Node.js into my Windows 2003 version of IIS it wasn’t painless. While creating an instance of Ghost blog engine on Azure Websites was ridiculously easy. Yeah ridiculously easy.
Let’s talk about some challenges.
DNS
My first battle was that I was pointing all my domains to the old box at OrcsWeb and using IIS to handle aliases and pointing to individual sites. I’m awful at IIS so this was always painful. Creating redirects (e.g. from www.wildermuth.com to wildermuth.com) and redirecting from old sites (e.g. agilitrain.com to wilderminds.com) were all done with individual ‘sites’ in IIS on my OrcsWeb box. I am sure for many of you that are more competent in IIS will tell me that is what DNS is for. And you’re right.
OrcsWeb has a good DNS manager that I could have done it there if I were more competent but when I decided to go to Azure Websites, I was perplexed how I was going to do this. In fact, I started to toy with using ASP.NET URL Rewriting to do it. Yeech.
It seems I had to actually learn how DNS works. I transferred my DNS back from my host to my domain provider (I use NameCheap and love them). By transferring them back, I could simply use their DNS tool to do the right thing.
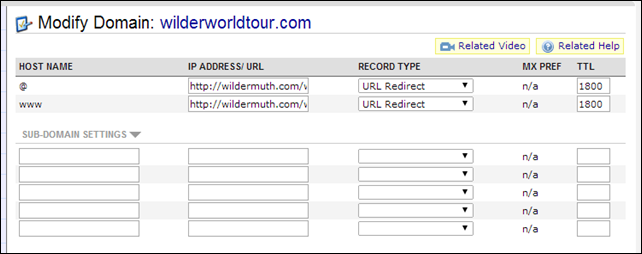
For example, I have a domain called WilderWorldTour.com for information on my upcoming year on the road. I needed to redirect to this directly to the part of my site that covers that. (I don’t’ really want a 301 redirect, just a simple redirect). NameCheap’s DNS made this easy:
This eliminated several steps. My registrar was pointing my DNS to OrcsWeb for DNS. That DNS was pointing to my local IIS which then redirected to the right place. Lots of things to manage. Now it’s in one place. You’ll have to understand how all this works but it’s not hard.
Custom Domains
The free tier of Azure Websites is great for small test or teaching projects but for many of my projects I really need custom domains for most of my projects. This means I have to move to the lowest non-free tier at least. The costs for Azure Websites is pretty low and since I have an MSDN subscription, it covers quite a lot of use without any cost directly to me (other than the MSDN subscription itself). To do this can confuse many so let me show you how this works (with NameCheap’s DNS setup at least…yours is probably similar).
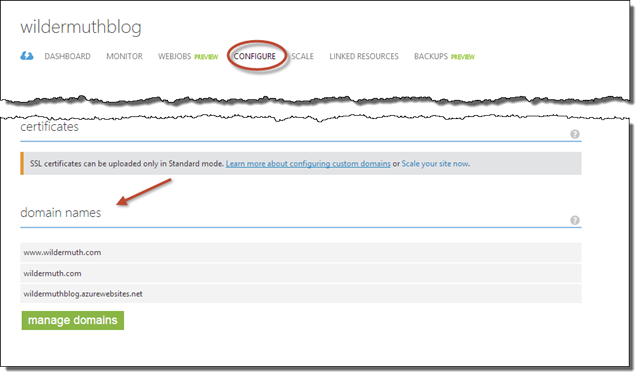
To do this you need to enable the Shared Web Hosting Plan and then in the Configure tab, add custom domains (you can do this from the home tab too, but here is where I do it):
The trick to using a custom domain is that you need to handle a few DNS records to point it at Azure Websites. For this example, we’ll use the wildermuth.com domain (not a subdomain). To start out you’ll need to find the IP address of the server you’re site is on. This is in the domain dialog (click “manage domains”):
First you need to point the wildcard DNS entry as an A-Record to this::
This will tell the Internet to go to that IP address when your domain is hit, but Azure still needs to verify that you own a domain so you need to create a CNAME entry.
When you create a new Azure Website, it’ll automatically host you on {yoursitename}.azurewebsites.net. For example, my blog is at http://wilderblog.azurewebsites.net. This is also the suffix that Azure Websites uses when you need this CName entry. The easiest way to do this is to create a CNAME entry called “awverify” that points to “awverify.{yourazurewebsitename}” or awverify.wilderblog.azurewebsites.net:
Make sure this is a CNAME record like shown here. Last step is usually to also support the www subdomain. To do this, you’ll need the www CNAME entry pointing at the Azure Website name (wilderblog.azurewebsites.com) but you’ll need a awverify entry here too. This entry should be named awverify followed by the subdomain + the Azure Websites (e.g. awverify.www.wilderblog.azurewebsites.net) with a CNAME value of the same value:
Then you’ll have a custom domain for your Azure Websites. Sure there are some moving pieces for the verification but it’s a one time deal.
Debugging
A new feature in Azure Websites that just blows me away is the ability to debug directly on the server. This is a big deal to me. Rarely the code I deploy works great locally, but on the server just doesn’t work as expected. This feature let’s me debug with Visual Studio 2012 or 2013 directly. To do this, you have to enable it in the Configuration tab:
Turning this on allows you to open the Server Explorer in Visual Studio and right-click the website to directly attach to the debugger:
This works. Just works. Amazing. Of course, I rarely use this and it is slow so it’s a fallback experience, should not be your main development experience. But it’s availability is awesome.
Monitoring My Websites
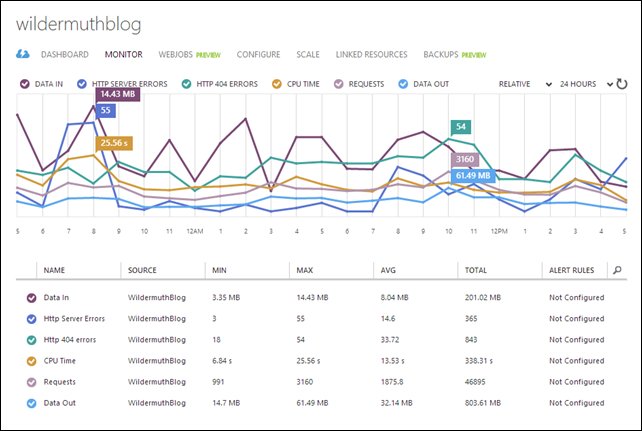
One of my favorite things about Azure Websites is to be able to see real-time stats of many of the characteristics I care about. I can even get alerts:
The Monitor tab is quite interesting and you can add a variety of different stats. You can even point these stats at a server so you can do your own analysis (I never do). In order to have alerts, you have to have monitoring endpoints which is a whole ‘nother blog post. But this is enough information for me!
Would you consider moving your websites to Azure?


