Thanks for visiting my blog!
UPDATE: James Ashley correct mentioned that there is no forward navigation in Windows Phone 7. So I updated the example.
In this first article in my two week series on Architecting Windows Phone 7 Silverlight Applications, I want to tackle the subject of Page Navigation. It may not be obvious to you at first blush but the entire WP7 application experience is based on a Navigation framework inside of Silverlight. This experience is very similar to the Navigation framework inside of the normal Silverlight, but its been extended to make more sense for Windows Phone 7. Because the phone requires that you support the back-button between screens, using navigation framework allows you to get this for ‘free’.
Even if your application is a single page, the navigation framework is still in there. It all starts in the Application class (App.xaml.cs or App.xaml.vb):
public partial class App : Application
{

  public PhoneApplicationFrame RootFrame { get; private set; }
  ...
}
Directly in the Application class is a reference to a class called PhoneApplicationFrame. This is the container in which all your pages will exist. It also keeps a record of the navigation through the frame so that forward and back are supported. Buried in the bottom of the Application is the initialization of the frame itself:
    #region Phone application initialization

    // Avoid double-initialization
    private bool phoneApplicationInitialized = false;

    // Do not add any additional code to this method
    private void InitializePhoneApplication()
    {
      if (phoneApplicationInitialized)
        return;

      // Create the frame but don't set it as RootVisual yet;
      // this allows the splash screen to remain active until the
      // application is ready to render.
      RootFrame = new PhoneApplicationFrame();
      RootFrame.Navigated += CompleteInitializePhoneApplication;

      // Handle navigation failures
      RootFrame.NavigationFailed += RootFrame_NavigationFailed;

      // Ensure we don't initialize again
      phoneApplicationInitialized = true;
    }

    // Do not add any additional code to this method
    private void CompleteInitializePhoneApplication(object sender,
                                                    NavigationEventArgs e)
    {
      // Set the root visual to allow the application to render
      if (RootVisual != RootFrame)
        RootVisual = RootFrame;

      // Remove this handler since it is no longer needed
      RootFrame.Navigated -= CompleteInitializePhoneApplication;
    }

    #endregion
This code essential creates the frame and sets it to the RootVisual on the Application class to make it the main look and feel of your application. If you’re coming from regular Silverlight development you might be looking for this code to instantiate your main XAML file (e.g. MainPage.xaml). It doesn’t. Once your frame is created, the runtime navigates to a place in your application for you, but how does it know? In the WMAppManifest.xaml file contains something called tasks. These are different starting points for Windows Phone 7 applications, but for your needs there is usually just one: _default:
...
  <Tasks>
    <DefaultTask  Name ="_default" NavigationPage="MainPage.xaml"/>
  </Tasks>
...
This tells the navigation framework to navigate to your XAML file first.
When using the Navigation framework, the resulting URI’s must point at Pages; specifically PhoneApplicationPage derived classes. You may have noticed that instead of the usual UserControl root element (or base class) in your MainPage.xaml that it is a PhoneApplicationClass instead:
<phone:PhoneApplicationPage x:Class="PhoneNavigation.MainPage"
...
This class represents a single page that can be navigated to. While you might use the Loaded method to execute code when the form is Loaded, the PhoneApplicationPage class also supports virtual methods for handling the result of navigation too:
protected override void OnNavigatedTo(NavigationEventArgs e)
{
  base.OnNavigatedTo(e);

  // TODO
}
The PhoneApplicationPage class supports OnNavigatedTo, OnNavigatedFrom and OnNavigatingFrom methods to allow you to handle what a particular view does before and after navigation. Understanding the correct page layout is important to making it clear to your users when to use the Back button.
You will need to have a way to navigate to individual pages from within other pages. Luckily there are a few ways:
HyperlinkButton
The easiest and most clear-cut way to perform navigation is with the HyperlinkButton control. Oddly (but I understand why), the HyperlinkButton only navigates between pages, it does not navigate to web URI’s currently (that’s what the WebBrowserTask is for). So if you place a HyperlinkButton and set its NavigateUri, it will navigate to the xaml file for you:
<HyperlinkButton NavigateUri="Foo.xaml" />The NavigateUri is really a Uri, so the Uri should be relative to the root of the XAP. This means you can have a nesting of views to navigate to.
Behaviors
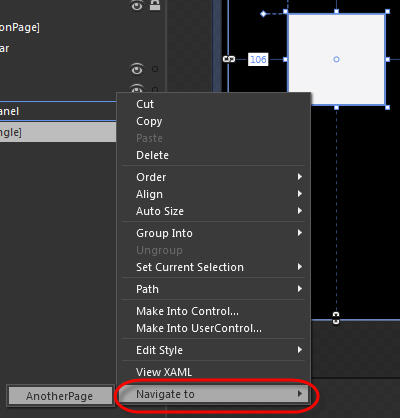
If you or your designer are using Blend to build the user interface, Blend supports a behavior for navigating to a different URI. What’s more interesting (and easy) is that they’ve added it to the context menu to make it easy to build:
NavigationService and NavigationContext
For all other cases, it makes more sense to usually handle navigation using the NavigationService class. This class contains a number of methods, events and properties to help you make smart decisions about navigation. For example:
void MainPage_MouseLeftButtonUp(object sender, MouseButtonEventArgs e)
{
  if (this.NavigationService.CanGoBack)
  {
    this.NavigationService.GoBack();
  }
  else
  {
    this.NavigationService.Navigate(
      new Uri("/AnotherPage.xaml", UriKind.Relative));
  }
}
For complex scenarios, the NavigationService also supports events so that you can have common code that handles when navigation happens (e.g. NavigationService.Navigating):
this.NavigationService.Navigating += (s, e) =>
  {
    if (e.NavigationMode == NavigationMode.Back)
    {
      // Handle Back Navigation Code
    }
  };
The NavigationService exists on the Application and Page classes. Also on these classes is an object called NavigationContext. The purpose of this class is to expose the query string of the navigation URI in a easy to use fashion. For example, you could use the NavigationService to include a URI that includes a query string:
this.NavigationService.Navigate(new Uri("/Views/Customer.xaml?id=101"));When you reach the navigated page you can then use the NavigationContext to retrieve the specific information about what you want to show.
protected override void OnNavigatedTo(NavigationEventArgs e)
{
  base.OnNavigatedTo(e);

  var fooValue = this.NavigationContext.QueryString["id"];
}
This pattern becomes important in having a rudimentary routing system (like ASP.NET MVC) which we will see is really useful as we implement MVVM in subsequent articles.
Making sense of the Navigation framework is an important first step to seeing how to implement a flexible architecture with Silverlight on the Windows Phone 7.
