Thanks for visiting my blog!

As RIA Services is plodding towards a release, many people are looking at it to help them with validation of data in Silverlight. Using this validation in Silverlight 3 is pretty straightforward but there are some caveats. I want to show you under the covers so you understand what is happening. In this first part of the series, let’s look at what it means to use validation from the outside.
How It Works
Back when Dynamic Data was being developed, a set of attributes was created to help tell the Dynamic Data folks about validation and other metadata so they could create smart scaffolds. These include:
- RequiredAttribute
- StringLengthAttribute
- RangeAttribute
- RegularExpressionAttribute
In addition, there were attributes that could tell Dynamic Data about how to name fields and such. This meant that if you were using a POCO class or a DTO, that you could do the annotation like so:
public class GameInfo
{
  [Required]
  [StringLength(100)]
  public string Name { get; set; }

  [Range(0d, 1000d)]
  public decimal Price { get; set; }
}
When the GameInfo class is generated on the client, that’s how the validaiton is happening. On the client we can simply bind to the DataForm to show the validation in action:
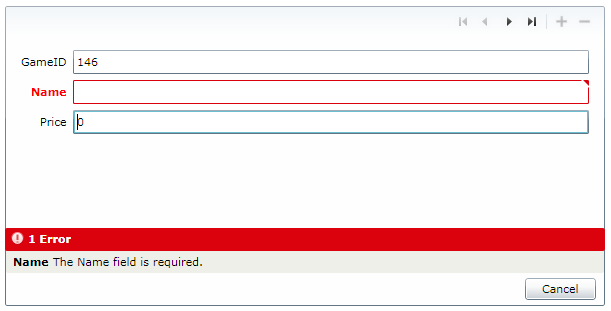
While the DataForm will do this in a generic fashion (or even let you define templates), many Silverlight applications would like this validation behavior without using the DataForm. In fact, all the Silverlight 3 controls now support it but only if you know how to bind the elements correctly. If we bind the GameInfo to a StackPanel with some controls, we can get this same validation experience:

This works in two ways. First the controls themselves have support built-in for the validation part of the user control. When you skin a TextBox or other control, part of the ControlTemplate is the validation UI. So you can change what that looks like. The controls themselves react to the validation errors because of the way they are bound. For example, this simple UI looks like this in XAML:
<TextBlock>Name</TextBlock>
<TextBox Text="{Binding Name, Mode=TwoWay,
                              NotifyOnValidationError=true,
                              ValidatesOnExceptions=true}" />
<TextBlock>Price</TextBlock>
<TextBox Text="{Binding Price, Mode=TwoWay,
                               NotifyOnValidationError=true,
                               ValidatesOnExceptions=true}" />
These three parts of the binding are critical to making this work. The validation is performed when the data is pushed back into the backing data but how does this actually work? The hint is in the “ValidatesOnExceptions”.
With a TwoWay binding, when you lose focus on a control, the value is pushed back to the control (including going through any converters you have specified). Normally if an exception is thrown during that process it fails to update the underlying object, but just swallows that error. But if you enable it with these two binding markup extensions, it assumes that any exception thrown during the TwoWay operation is a Validation error. Back in Silverlight 2, you could do this by simply adding validation logic directly in your data classes like so:
public string Name
{
  get
  {
    return this._name;
  }
  set
  {
    if ((this._name != value))
    {
      if (value.Length > 100)
      {
        throw new ValidationException(
          "String cannot be longer than 100 characters");
      }

      this._name = value;
    }
  }
}
This is where the Validaiton attributes we mentioned earlier come in. The controls themselves do not make the check for the validation. Instead there are two classes that come into picture. ValidationContext and Validator. These classes can be used to test a property’s or an entire object’s set of validation attributes. Essentially, the ValidationContext sets up what needs to be validated and the Validator performs the validation like so:
public string Name
{
  get
  {
    return this._name;
  }
  set
  {
    if ((this._name != value))
    {
      var ctx = new ValidationContext(this, null, null);
      ctx.MemberName = "Name";

      // If fails, throws an excption
      Validator.ValidateProperty(value, ctx);

      this._name = value;
    }
  }
}
These classes working together validates the value against whatever ValidationAttributes are on the “Name” property (e.g. Required, StringLength) and throws a ValidationException when it fails. In fact, lets look look at the RIA Services class it generates in Silverlight:
[DataMember()]
[Required()]
[StringLength(100)]
public string Name
{
  get
  {
    return this._name;
  }
  set
  {
    if ((this._name != value))
    {
      this.ValidateProperty("Name", value);
      this.OnNameChanging(value);
      this.RaiseDataMemberChanging("Name");
      this._name = value;
      this.RaiseDataMemberChanged("Name");
      this.OnNameChanged();
    }
  }
}
In fact, the first thing that the generated class does is call a base class method called ValidateProperty which does the same thing as our previous example. Understanding how this really works is key to debugging odd scenarios (like a validation exception showing up for a conversion failure).
Trouble with the Code Generation
Most of us are not using POCO classes (yet) for our data containers, but are using ORM’s to build our data layers for us. This was a problem for the Dynamic Data folks back a while and came up with the idea of Metadata Types. A metadata type is simply a way of specifying a candiate class. In fact RIA services does this for you (if you ask it nicely) but you can specify these yourself. The key is the MetadataType attribute which is useful to do in the partial class. For example for an Entity Framework type:
[MetadataType(typeof(Game.GameMetadata))]
public partial class Game
{
  internal sealed class GameMetadata
  {
    // Metadata classes are not meant to be instantiated.
    private GameMetadata()
    {
    }

    public string Description;

    public string Developer;

    public EntityState EntityState;

    public int GameID;

    public Genre TheGenre;

    public string ImageUrl;

    [Required]
    [StringLength(100)]
    public string Name;

    [Range(0d, 2000d)]
    public Nullable Price;

    public string Publisher;

    public Rating TheRating;

    public Nullable<DateTime> ReleaseDate;
  }
}
This class is a place that the validation or dynamic data runtimes can look for the attributes. Note, that this example uses a nested type but it could be a completely separate type as well.
NOTE: This works with RIA Services great. But its a hack. To pretend its anything but a hack is deluding yourself. My opinion is that this sort of information that is view specific should probably be loosely coupled instead of tightly in the form of attributes. If we did this on POCO classes, we’d be forced to have the validation attributes exist as a reference in every place we need them.
Just RIA Services?
There are many organizations out there that aren’t using RIA Services for their data access (and i’ll blog soon about why RIA Services is just a solution, not *the* solution data access). But if you are already using ADO.NET Data Services or Web Services, hooking into the validation logic is difficult. Adding the attributes is difficult in Silverlight since the generated code doesn’t have any place to hook up the attributes (and MetadataType isn’t supported in Silverlight). In addition, the attributes are only part of the problem as you’d need to build in the ability to do the validation on the set/gets (which is possible with ADO.NET Data Services but impossible with today’s Web Service proxies). So today, this is most easily accomplished using RIA services. But I don’t believe that in the best interest of developers.
If you’ve followed this blog, you know that I love the idea of choice (e.g. my LINQ to Hibernate ADO.NET Data Example). So I want to be able to leverage the Validation logic no matter what what data access you’re using. I have started a new project called Niagara that I hope will address some of these issues. See my blog post about it here:
http://wildermuth.com/2009/09/28/Introducing_Project_Niagara
