Thanks for visiting my blog! See more about me here: About Me

If you’ve taken my “Building an API with ASP.NET Core” course over at Pluralsight, one of the more complicated tasks is to add support for JWT Bearer tokens. In .NET 7, they’ve simplified this quite a bit. Let’s take look.
A Video Walkthrough on Coding Shorts: https://youtu.be/osZvEAJrz1Y
Instead of showing you how it used to work, let’s just talk about how to add JWT Bearer tokens to a new project. I started out with a simple Web API project (controller-based), though this technique is identical for gRPC or Minimal APIs. When we start out, authorization isn’t even enabled (unless you chose for it to scaffold authorization), but I’m going to assume that Program.cs looks similar to this:
var builder = WebApplication.CreateBuilder(args);

// Add services to the container.

builder.Services.AddControllers();
// ...
builder.Services.AddEndpointsApiExplorer();
builder.Services.AddSwaggerGen();

var app = builder.Build();

// Configure the HTTP request pipeline.
if (app.Environment.IsDevelopment())
{
    app.UseSwagger();
    app.UseSwaggerUI();
}

app.UseHttpsRedirection();

app.UseAuthorization();

app.MapControllers();

app.Run();
The only hint about Authorization is the UseAuthorization which is just the middleware to check for any Authentication Schemes that are added. You might also note that there is not a UseAuthentication any longer. It is no longer necessary to include both.
So let’s support JWT Bearer Tokens. First we still need to add the package to our project:
> dotnet add package Microsoft.AspNetCore.Authentication.JwtBearerOnce added, we can wire up authentication:
builder.Services.AddAuthentication();One thing to note here is that you do not need to specify a default scheme any longer (the first scheme is assumed default). So we can call the AddJwtBearerToken call that you might be used to:
builder.Services.AddAuthentication()
                .AddJwtBearer();
Ordinarily, you would need to configure the token here but finally we have sensible defaults. We’ll get back to configuring it. But first, let’s head over to the Controller Action and add that magic Authorize attribute (just like before):
[ApiController]
[Route("[controller]")]
[Authorize]
public class WeatherForecastController : ControllerBase
So if we open the API, we get:
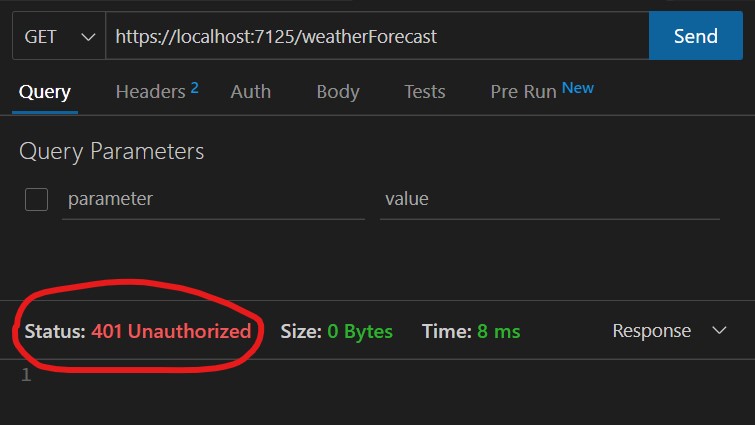
Don’t worry, that’s what was supposed to happen!
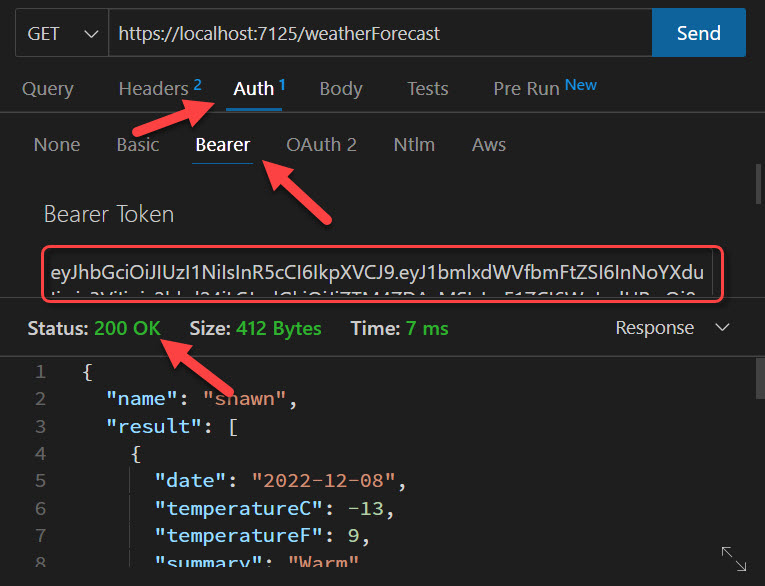
Since we setup JWT Bearer tokens, we should be able to just add a token to the request and it should work. But how do we get a token? Ah, another gem inside .NET 7: dotnet user-jwts. The user-jwts took is all about being able to look at a project and build a developer JWT from the configuration. Yes, this means you don’t have to build your API for returning tokens until you actually need to. To use it just call the create sub-command:
>dotnet user-jwts createIt will spit out:
Token: eyJhbGciOiJI...QpMdl0LRL7w1f1cnEu7dwJMvw4eSi1px56dneQ5tOQgNo, this isn’t really my token. But you’ll see that it will paste out an entire JWT Bearer token that we can then use in the request testing:
Last note, we can still configure the JWT Bearer token, but now we can use configuration like adults. In fact, the user-jwts tool will add a section in your development appsettings.json file the first time you create a JWT:
  "Authentication": {
    "Schemes": {
      "Bearer": {
        "ValidAudiences": [
          "http://localhost:64693",
          "https://localhost:44317",
          "http://localhost:5124",
          "https://localhost:7125"
        ],
        "ValidIssuer": "dotnet-user-jwts"
      }
    }
  }
Your exact settings will be a little different, but you can see that you can specify all the JWT settings here in configuration. Since this is in the appsettings.development.js file, those tokens created by user-jwts will never work in production as an added security gate (see how the ValidIssuer is the user-jwts tool). In fact, if we decode our JWT that it generated, we can see that it doesn’t have anything special except for machine user name which it uses as the unique id:
{
  "unique_name": "shawn",
  "sub": "shawn",
  "jti": "be38d021",
  "aud": [
    "http://localhost:64693",
    "https://localhost:44317",
    "http://localhost:5124",
    "https://localhost:7125"
  ],
  "nbf": 1670459953,
  "exp": 1678235953,
  "iat": 1670459954,
  "iss": "dotnet-user-jwts"
}Most of this should look familar! Let me know what you think!
