Thanks for visiting my blog! See more about me here: About Me

![]()
In Part 1 of this series, I talked about why I used MVC to create my new venture. In this second part, I will talk about how I implemented MVC.
Stubbing out the Site
When I decided to implement MVC, I was very new to it so there is some code in the site that reflects that. The later code and the code I’ve gotten around to refactoring is much cleaner, but working code is working code.
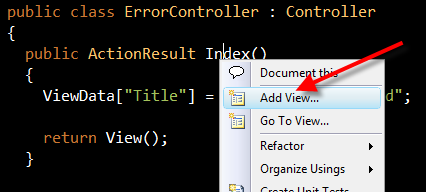
My first step was to create a couple controllers for the first sections I knew I wanted to implement. I started with the Home and Workshop areas. One of my favorite features of the Visual Studio support is that I can create controllers, then stub out actions and views quickly. Once you have a controller and an action, you can simply right-click and use the context menu to create the view for an action:
Better URLs
I was using the standard routes that the template gave me (<Controller>/<Action>/<id>) and for what I was doing that was fine. I have considered replacing it at some point but it never became important.
One of my pet peeves though is that it becomes easy to create an action that takes a primary key value (e.g. WorkshopID). That would end up with URI’s like:
http://agilitrain.com/Workshop/Info/15But that is just as bad as using a query string as far as I am concerned. Not only does the user not care about the key value but it doesn’t add value (to the user or search engines). So I used strings as my IDs. For example, my Workshop Info action looks like this;
public ActionResult Info(string id)
{
}
By using a string I could just use the name of the workshop to get better URI’s (though that means searching by name in the database, but the number of workshops is going to be so small that the heavier weight on the database won’t matter in the big picture). My string based URI’s were better:
http://agilitrain.com/Workshop/Info/Silverlight%20Tour%20WorkshopWhile this is better, it is still not great. The URL encoding replaces the spaces with the “%20” which makes it harder to read. I relented and encoded/decoded my own IDs with a little piece of code that simply replaced all spaces with underlines. If you choose this approach, make sure you do the replacement on both sides (e.g. replace them when you create ActionLinks and reverse it in the Actions). My resulting URI’s were much more reasonable:
http://agilitrain.com/Workshop/Info/Silverlight_Tour_WorkshopWhat is the Model in MVC?
The last thing I’ll share in this part of the article is my initial thoughts about how ASP.NET MVC handles models. I could see early on that a common way to share information between the controller and the view was to use ViewData. ViewData is a structure that is passed on to the View and is a simple dictionary lookup. For example, to set the page, I used a “Title” parameter in every action:
ViewData["Title"] = "Login Page";This works but for most of your data this isn’t a great method. In early pages I peppered them with several different pieces of ViewData but that meant on my pages I needed to do a lot of casting as well as not having a single unit of data I could test my controller and views with.
Instead you can also return the model for a view directly by returning a View from your controller and including it as a parameter:
public ActionResult Login()
{
  return View(someObject);
}
So what should you return as the model? Early articles I saw were returning domain object (e.g. entities directly from the database). This works but it makes it harder to separate other functionality and mix data. What I was urged to do instead was create a model for the need. For example, on my Workshop info page, I needed information about the workshop, upcoming events and some information about the current attendee. So instead I created a simple model class:
public class WorkshopInfo
{
  public Workshop Workshop { get; set; }
  public Attendee Attendee { get; set; }
  public Event[] Events { get; set; }
}
This allows me to setup all the data I need then pass it to view in one step. This works much better but there was still some casting. To get around this you should use a typed view:
public partial class Info : ViewPage<WorkshopInfo>
{
}
Or if you’re using the new MVC RC’s ability to have views without code-behind:
<%@ Language="C#"
Inherits="System.Web.Mvc.ViewPage<AgiliTrain.Data.Workshop>" %>
This allowed me to get the data into my views, but I when I was ooking at the sparse documentation it caused me to thrash a bit with how to handle data entry pages (e.g. Login). The cool thing is that you can specify in the controller two actions (e.g. methods) for a view. The trick is to specify what HTTP verbs are going to be used for which methods. For example:
[AcceptVerbs(HttpVerbs.Get)]
public ActionResult Login()
{
  // ...
}

[AcceptVerbs(HttpVerbs.Post)]
public ActionResult Login(string username, string password,
                          bool rememberMe, string returnUrl)
{
  // ...
}
For my login action, the first method is called when the login URL is used, but when I post-back from the Login page the second method is used. One thing you should notice is the parameters of the 2nd method. The ASP.NET MVC framework attempts to match the form input’s to a list of parameters. When I coded the Login page that made a lot of sense and made it simple…but of course when I got to larger forms this became a bad idea. You can imagine some of the actions having a huge number of parameters which is hard to maintain.
In fact if we track back to the Model idea, its the same solution. If we define a model that has types for the data in our forms, we can use it as the parameter to the POST method. The ASP.NET MVC framework will look at the post variables and create the type and attempt to set the values of the new type. For example our LoginInfo model should look like this:
public class LoginInfo
{
  public string UserName { get; set; }
  public string Password { get; set; }
  public bool RememberMe { get; set; }
  public string ReturnUrl { get; set; }
}
Then our login method can take that structure and the framework will handle setting and getting the data for us:
[AcceptVerbs(HttpVerbs.Post)]
public ActionResult Login(LoginInfo model)
{
  // ...
}
In many cases (though Login isn’t one of them) you could fill in this model and send to the view in the GET so that you have the initial data for the form, not just retrieving from the POST. In fact, I have the model handle the validation for me so I can use the same model in multiple places and have the data inside it be valid for my data entry screens.
In the next part of this article I will delve further in the data entry screens on how the model is used to fill in data.
